Have you ever joined a video call and seen your boss’s face in dark shadows? Or maybe your own face looks washed out and flat on Zoom. Good webcam lighting fixes both problems. You do not need a fancy studio. You do not need a film degree. With the right lights, you can look sharp, clear, and professional on every remote call.
In this guide, you will learn how to set up the best webcam lighting for remote work. You will pick a setup that fits your budget. You will learn the basic rules of light. You will follow five simple steps to build your setup. By the time you finish, you will look better than 90% of people on video calls. Let’s start.
Quick Picks — Best Webcam Lighting Setups for Every Budget
Before we dive deep, here are three solid webcam lighting setups. Pick the one that fits your pocket.
Best Budget Setup (Under $50): USB Ring Light + DIY Diffuser
A small USB ring light that clips to your monitor costs around $20. It gives soft, even light on your face. You can add a cheap white paper diffuser in front to soften shadows. This webcam lighting setup is great for students and part-time remote workers.
Best Value Setup ($50–$150): Monitor-Mounted Light + Smart Bulbs
A monitor light bar like the BenQ ScreenBar or Xiaomi light bar gives nice desk light without screen glare. Pair it with a smart LED bulb behind you for a warm back glow. This webcam lighting setup is clean, smart, and works in most home offices.
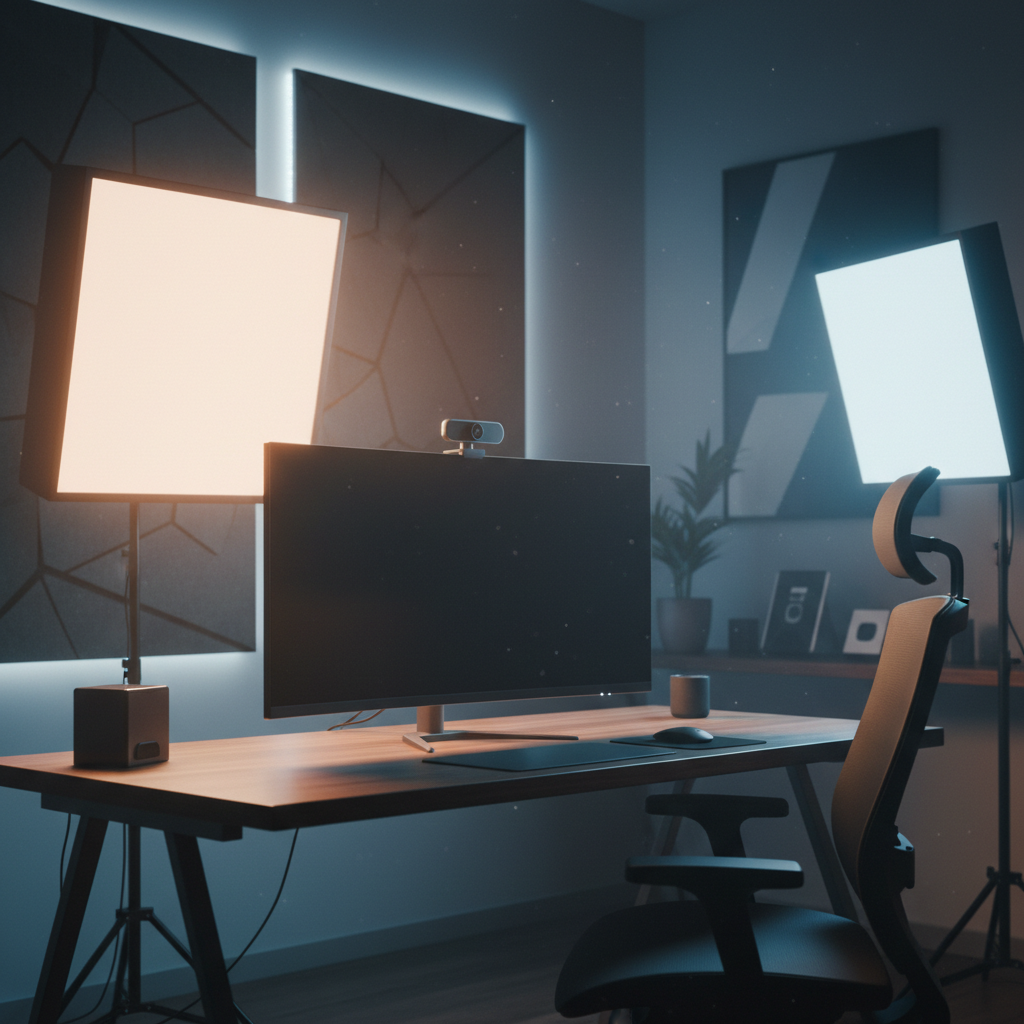
Best Professional Setup ($150–$300): Full 3-Point LED Panel Kit
A kits with three small LED panels (key, fill, back) gives total control over your look. Brands like Neewer, Emart, and GVM sell great starter kits. This is the best webcam lighting choice if you host webinars, teach online, or record video content.
The Fundamentals: Color Temperature, Brightness, and CRI for Webcam Lighting
Gear is only half the story. To pick the best webcam lighting, you must understand three simple rules of light.
Color Temperature — Why 4000K–5500K Is the Sweet Spot
Color temperature is measured in Kelvin (K). A low number like 2700K looks warm and yellow, like a fire. A high number like 6500K looks cold and blue, like daylight. For webcam lighting, aim for 4000K to 5500K. This range looks like soft morning light. Your skin tones stay natural. Your eyes stay calm during long calls.
Brightness Targets — Aim for 500–1000 Lux at Face Distance
Brightness is measured in lux. A dim room has about 100 lux. A bright office has about 500 lux. Direct sunlight has 10,000 lux. The best webcam lighting gives 500 to 1000 lux on your face. This is bright enough for a crisp image but not so bright that your eyes hurt. You can check lux with a free phone app.
CRI Ratings — Why Color Accuracy Matters on Video Calls
CRI stands for Color Rendering Index. It shows how true colors look under a light. The top score is 100. A CRI of 90 or higher means reds look red, greens look green, and your skin looks healthy. Cheap lights have a CRI of 70, which makes you look sick on camera. Always check CRI when you buy webcam lighting gear.
Preparation: Tools and Materials You Will Need
Before you set up your webcam lighting, gather these simple tools. Most are cheap and easy to find.
- One main light (ring light, LED panel, or monitor light bar)
- One backup fill light (desk lamp, second LED, or even a phone screen)
- One optional backlight (small LED or strip light)
- A phone light meter app (Lux Light Meter, Phyphox)
- White printer paper or frosted plastic for a diffuser
- A sturdy desk clamp or light stand
- A tripod or laptop riser for your webcam
- A piece of cardboard or foam board to bounce light
You can start with just the main light. Add extras later as your budget grows.
Step-by-Step: How to Build Your Best Webcam Lighting Setup
Follow these five steps in order. Take your time. Test your setup on a real Zoom call before a big meeting.
Step 1 — Assess Your Room Size and Existing Natural Light Sources
Stand in your home office and close the curtains. Look at the room in total darkness. Now open the curtains and see how much daylight comes in. Note where the window is.
- Measure the room length with your phone or a tape. Small rooms are under 10 feet. Large rooms are 15 feet or more.
- Check which wall faces the window. North windows give soft, even light. South windows give strong, warm light.
- Write down these notes. They decide where your webcam lighting should go.
- If you work in a basement, plan a full-artificial setup. If you work near a big window, plan a mixed (natural + artificial) setup.
This step takes five minutes and saves you hours of guesswork.
Step 2 — Position Your Key Light Using the 45° Rule (Clock Method)
The key light is the main source of light on your face. Imagine you sit at the center of a clock, facing 6 o’clock, with your webcam at 6.
- Place your main light at the 10 o’clock or 2 o’clock spot. This is 45 degrees left or right of your webcam.
- Raise the light so it sits just above eye level, angled down at 30 degrees.
- Set the distance to about two to three feet from your face.
- Sit in front of your webcam and check your face. The light side should be bright. The shadow side should be soft, not black.
- Adjust height and angle until your eyes have a small bright reflection. This is called an “eye light” or “catchlight.” It makes you look alive.
This key light gives your webcam lighting its main shape and mood.
Step 3 — Add a Fill Light to Soften Shadow Side Contrast
The fill light removes harsh shadows from the key light. Without a fill, your shadow side looks too dark.
- On the opposite side from your key light, put a softer, dimmer light. A small LED panel at 50% power works great.
- Keep the fill light lower in brightness than the key light. A good ratio is two-to-one (key is twice as bright as fill).
- You can also use a white foam board instead of a second light. The board bounces light from the key into the shadow side.
- Check your webcam again. Your face should have gentle shading, not strong dark halves.
A good fill light is what makes webcam lighting look professional instead of flat or harsh.
Step 4 — Place a Backlight for Depth and Background Separation
A backlight sits behind you and lights your hair and shoulders. It pops you out from the background.
- Place a small LED or strip light behind you, angled down at your back of your head.
- Keep it subtle. A soft warm glow works better than a bright white light.
- If you have bookshelves or plants, use an LED strip or lamp to light the background gently.
- Make sure the backlight never hits your webcam lens. This causes flare and washes out the image.
The backlight adds depth. It is the secret touch that makes webcam lighting look like a real studio.
Step 5 — Tune Your Webcam Settings (Exposure, White Balance, Auto-Light) to Match Your Lighting
Now lock in your webcam software so it matches your fixed setup.
- Open Zoom, Teams, or your camera app. Go to Video Settings.
- Turn off auto-exposure. Slide the exposure bar until your face looks natural.
- Turn off auto-white balance. Set it to 4500K or 5000K. This keeps your skin tone steady.
- Turn on HD mode or “720p” minimum. 1080p is even better if your camera supports it.
- Check the preview. If your image is noisy, raise the room light instead of raising the software gain.
- Save your settings. Test the call with a friend for one last check.
This last step locks in the quality of your webcam lighting. It keeps you looking great on every call.
How to Optimize Webcam Lighting for Different Home Office Room Sizes
Every room changes how webcam lighting behaves. Here is how to adapt.
Small Rooms and Apartments — Compact, Bounce-Based Lighting Tips
In small rooms, walls are close. Light bounces fast and can feel harsh. Here is how to keep it soft.
- Use a ring light or small softbox. They spread light gently over short distances.
- Bounce your key light off a white wall instead of firing it at your face.
- Keep the camera close to your body and the light right beside the webcam.
- Turn off warm ceiling lights. They mix color and create orange tones.
Large Home Offices — Scaling Up Your 3-Point Webcam Lighting Setup
In big rooms, light falls off fast. A single light will not reach you well. Here is the fix.
- Use stronger lights. A 50-watt LED panel beats a 10-watt ring light in big spaces.
- Move your three lights closer to you, not farther away. Use a tripod next to your desk.
- Add a second fill light on the camera side to balance big shadows.
- Consider a hair or rim light to cut you out from the wide background.
Best Webcam Lighting Setups by Scenario for Remote Workers
Your workday changes lighting needs. Here are three common scenarios.
Daytime Calls — Maximizing Natural Window Light With Artificial Fill
If you work near a window during the day, face the window. Let daylight be your key light. Put a soft desk lamp or ring light in front of you on the shadow side as a fill. This webcam lighting mix looks natural and saves power.
Evening and Night Meetings — Full Artificial Lighting Transition Workflow
At night, close your curtains. Turn off the room’s main light. Use your three artificial lights only. This gives you full control. The webcam lighting looks consistent, no matter what time the call is.
Quick Standups vs. Long Meetings — Lighting Adjustments to Reduce Eye Strain
For a 10-minute standup, a single ring light is fine. For a three-hour workshop, dim your lights by 20% and use a warmer tone around 4500K. This webcam lighting setup is easier on your eyes for long days.
7 Common Webcam Lighting Mistakes Remote Workers Make (and How to Fix Them)
Even smart people make camera mistakes. Watch out for these seven.
Using Only Overhead Fluorescent Lighting
Overhead lights make dark circles under your eyes. They also have a green tint. Fix: add a good front webcam lighting source and turn off the ceiling light during calls.
Sitting With a Window Behind You (Backlighting Disaster)
Your camera will make your face dark and the window bright. You will look like a shadow. Fix: face the window. If you must keep the window behind, raise a front light to balance it.
Mixing Multiple Color Temperatures at Once
One warm bulb plus one cool window creates a weird half-orange, half-blue face. Fix: match all light sources to the same color, around 4500K. Or use a smart bulb to tune the warm light to match daylight.
Skipping Light Diffusion (Causing Harsh Glare and Shadows)
Bare bulbs cast sharp shadows and create glare on glasses. Fix: put a white cloth, paper, or plastic sheet in front of the bulb. This softens your webcam lighting.
Ignoring Webcam Software Settings (Auto-Exposure and HD Mode)
Auto settings keep shifting the brightness during the call. Fix: lock your exposure and white balance in Zoom or Teams. Always turn on HD.
Placing Your Light Too Far From Your Face
Light falls off with distance. A dim light three feet away looks much darker than a bright light two feet away. Fix: move your main webcam lighting closer, even if it looks funny off-camera.
Forgetting to Check How You Look Before Joining a Call
You set the light yesterday but moved the chair today. Fix: do a 10-second preview test in Zoom before every important call. This small habit keeps your webcam lighting on point.
FAQ: Best Webcam Lighting Setup for Remote Work
Do I Need a Ring Light or an LED Panel for Webcam Lighting?
A ring light gives even, shadow-free light and is best for talking-head calls. An LED panel gives more power and better shape, so it is best if you record content or move around. For most remote workers, a ring light under $40 is enough.
Can I Get Good Webcam Lighting Without Buying Expensive Gear?
Yes. Sit facing a window during the day. At night, use a cheap desk lamp with a white sheet in front of it. Bounce the light off a white wall. This free webcam lighting trick works surprisingly well.
What Is the Best Webcam Lighting Position for Zoom and Teams Calls?
The best spot is 45 degrees from your face and just above eye level. This gives a natural, flattering look. Keep the light one or two feet away so it stays soft.
Pro Tips to Level Up Your Webcam Lighting Setup
Once your basic setup works, try these small upgrades.
- Add a small LED light strip behind your monitor. It creates a pro halo effect.
- Use a smart plug to turn all your lights on and off with one voice command before a call.
- Keep a small reflector (a white clipboard) on your desk to bounce light into your chin area.
- Save a “camera preset” photo in your notes so you can check your look fast each morning.
- If you wear glasses, angle your key light slightly higher (60 degrees) to stop the glare.
Summary: Key Takeaways and Next Steps
Great webcam lighting does not need to be expensive. It needs to be planned. Here are the key points to remember:
- Pick a setup that fits your budget. A ring light is fine. A 3-point kit is better.
- Keep color temperature between 4000K and 5500K for natural skin tones.
- Aim for 500 to 1000 lux on your face during calls.
- Place your key light 45 degrees from your face and above eye level.
- Add a fill light or a white reflector to soften shadows.
- Use a backlight to separate you from the background.
- Lock your webcam settings so auto features do not ruin your look.
- Test your camera before every important call.
Your next step is simple. Pick one budget tier from this guide. Order the lights. Set them up this weekend. Then join your next Monday meeting and watch people notice the difference. A small upgrade in webcam lighting can make a big difference in how others see you. Now go shine on camera.